The iron condor setup is one of the most reliable defined-risk strategies in options trading. It’s designed to generate steady income without needing to predict direction, making it a favourite among SPX traders and anyone who wants consistent results rather than high-risk bets.
I learned this strategy more than three decades ago on Wall Street, and it remains one of the most effective tools in my playbook. With the right structure, the iron condor gives you a wide profit zone, limited downside, and a clear, rule-based approach to managing risk.
Some days, prices barely move. And that’s where the Iron Condor strategy shines. An Iron Condor is a defined-risk options setup designed to profit when the market trades sideways or inside a tight range. In other words, it’s a defined-risk options strategy that aims to generate steady income when price does “nothing dramatic.” If you’re an options trader who likes steady income instead of wild bets, this strategy is for you.
In this guide, I’ll walk you through how to set up an iron condor, how the payoff works, when to use it, and the adjustments that keep the trade safe, even when price starts testing your wings. We’ll also look at SPX Iron Condor examples, real-world payoff ideas, and how to manage trades like a pro.
Quick Answer
What is an iron condor strategy?
An iron condor is a defined-risk, neutral options strategy that combines a bull put spread and a bear call spread on the same underlying asset with the same expiration date.
You collect a net credit upfront and profit when price stays between the two short strikes through expiration. Maximum profit is the net credit received. Maximum loss is the spread width minus the net credit. It works best in low-volatility, range-bound markets.
How the Iron Condor Works (Bull Put + Bear Call Spreads)
When I explain the Iron Condor strategy to new traders, I like to call it the “steady flier” of the options world. It’s not flashy, but it’s built to glide smoothly through calm skies — those quiet, low-volatility markets most people overlook.
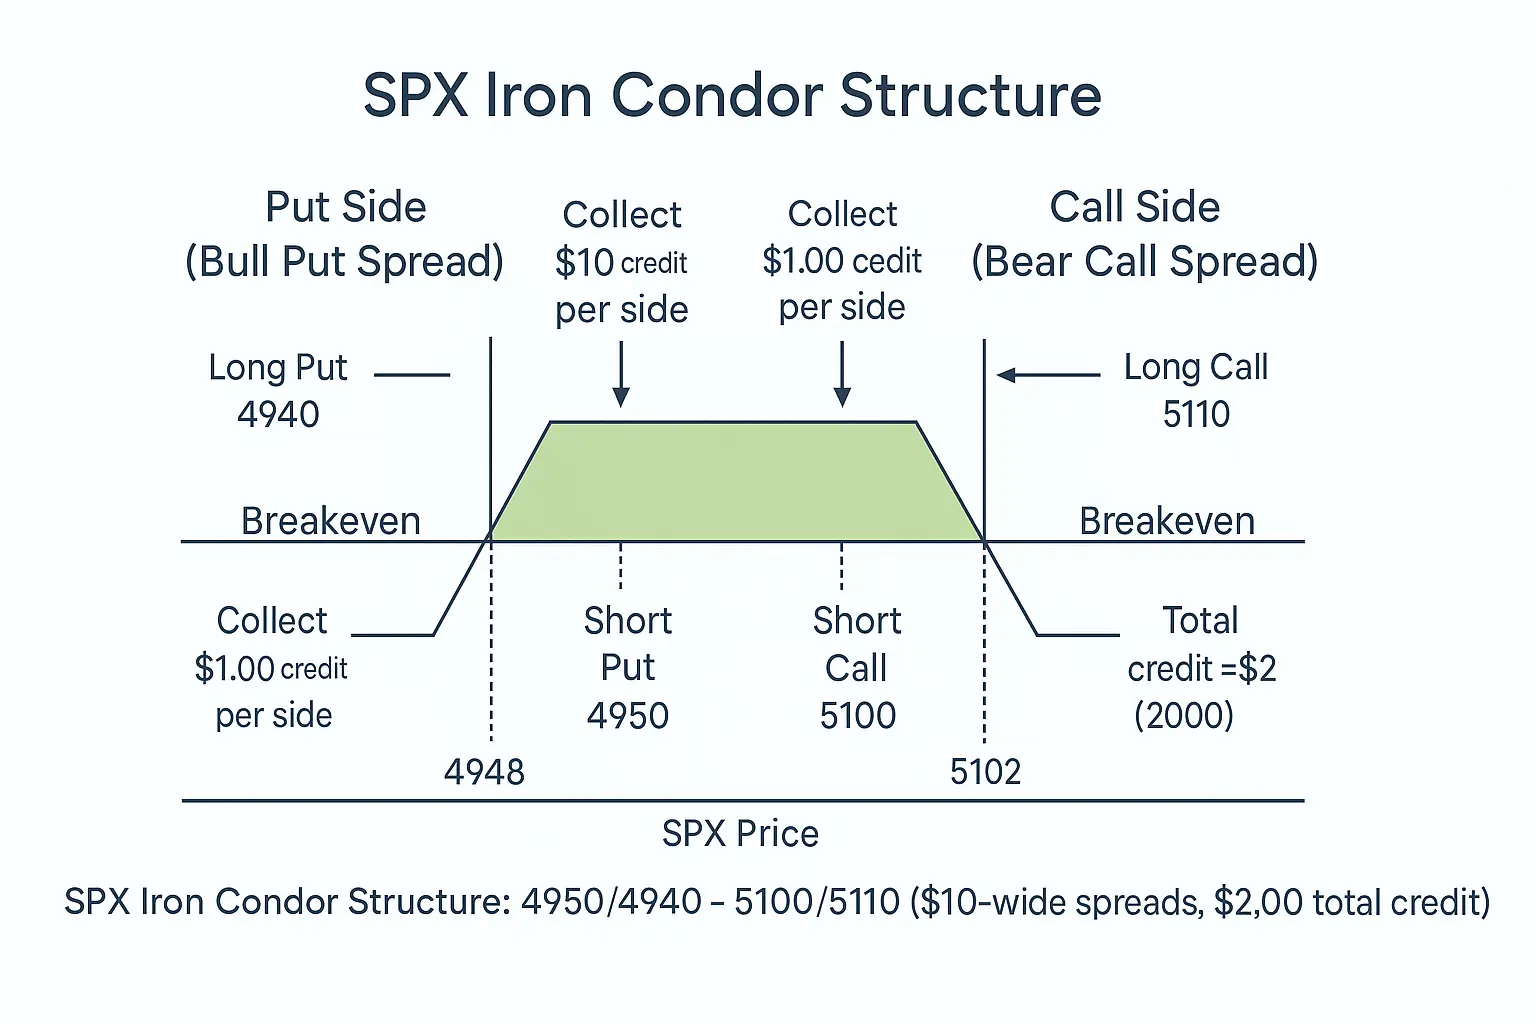
At its core, the Iron Condor is made up of two credit spreads:
- A bull put spread (your safety net on the downside)
- A bear call spread (your cap on the upside)
Each spread collects a premium upfront. Put them together, and you’ve got a defined-risk, range-bound setup that earns income while you sleep. The name “Condor” comes from the shape of the payoff chart — two wings spread wide, just like the bird.
Bull Put Spread (Downside Wing)
This part handles the lower end of your price range:
- Sell one put option at a higher strike.
- Buy another put at a lower strike to limit risk.
You collect a net credit for taking that small, controlled risk. This side benefits if the price stays above your short put strike. In other words, you’re betting the market won’t crash.
Bear Call Spread (Upside Wing)
This covers the upper range:
- Sell one call at a lower strike price.
- Buy another call at a higher strike to cap your risk.
You collect another credit from the call side. This part wins if the price stays below your short call strike. Basically, you’re saying, “I don’t think the market will shoot past this level anytime soon.”
When you combine both spreads, you form a balanced position that profits when price stays between your short call and short put strikes. You’re selling time — also called theta — and letting it decay in your favor every day the market stays quiet. This is a theta-positive position.
If you’re new to these setups, see our internal guides on Bull Put Spread and Credit Spread Strategy. They’ll help you understand each wing before you fly the Condor.
Now, here’s the beauty of this design:
- The profit zone sits in the middle, where neither spread gets fully tested.
- Your losses are capped by the long options you buy for protection.
- You collect a credit upfront, which is your potential max profit if price stays within the range.
Think of it like setting up invisible goalposts: the ball (price) can bounce around all day as long as it doesn’t cross your lines. You make money when the game stays calm.
Why Traders Love It
I’ve seen traders of all levels use the Iron Condor for one reason: defined risk, defined reward. Unlike naked options, you know the worst-case scenario before you click “submit.” That’s a big deal, especially for smaller accounts.
Another advantage? The Iron Condor strategy doesn’t need perfect timing. You’re not trying to guess where the market will go; you’re betting on where it won’t. That’s a lot less stressful.
Most traders, including myself, prefer to use Iron Comdors on index options like SPX, NDX, or ETFs such as QQQ and IWM. These instruments are liquid, have tight bid-ask spreads, and don’t get crushed by random earnings announcements like individual stocks.
You can also control your exposure with small adjustments. Want more credit? Bring your strikes closer. Want more safety? Spread them wider. It’s flexible, forgiving, and ideal for traders who want steady income over sudden adrenaline.
To sum it up: the Iron Condor is a “sell-high, buy-higher protection; sell-low, buy-lower protection” setup. It creates a middle ground where profits stack up slowly and losses stay contained. It’s not about predicting the future; it’s about getting paid while the market does nothing fancy.
For a neutral overview, traders often reference external sources like Investopedia’s breakdown of the Iron Condor and tastytrade’s practitioner guides. (On our site, we’ll replace those with internal training resources.)
Payoff, Max Profit/Loss, and Breakeven
Now let’s talk numbers — the part every trader cares about. The Iron Condor payoff diagram looks like a flat-topped hill. Maximum profit sits in the middle, and loss is limited on both wings.
Here’s how the math works:
Maximum Profit
The total credit collected from both spreads.
Maximum Loss
The distance between strikes of either spread minus the credit received.
Breakeven Points
- Upper Breakeven = Short Call Strike + Net Credit
- Lower Breakeven = Short Put Strike − Net Credit
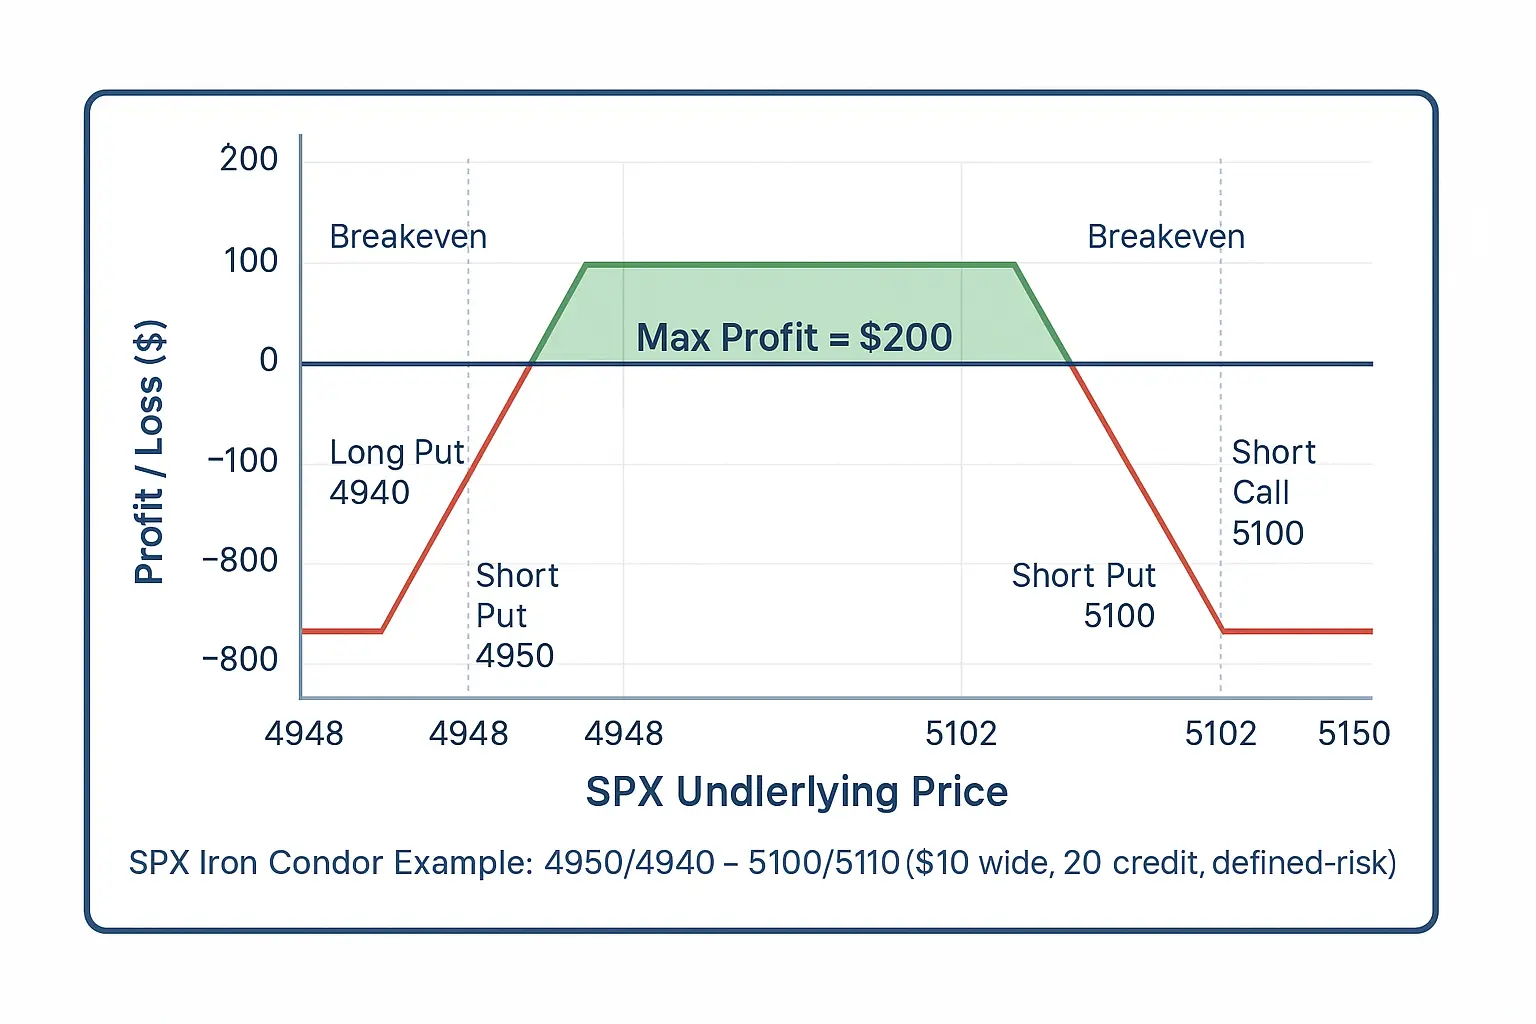
Example SPX Iron Condor – $10 Wide, $2.00 Total Credit
Example structure (SPX):
- Call spread (bear call side):
Sell SPX 5100 Call for $1.60
Buy SPX 5110 Call for $0.60
Net credit from call spread = $1.00 ($100) - Put spread (bull put side):
Sell SPX 4950 Put for $1.70
Buy SPX 4940 Put for $0.70
Net credit from put spread = $1.00 ($100)
Total credit received: $1.00 + $1.00 = $2.00 total ($200)
Max profit: $200 if SPX stays between 4950 and 5100 through expiration and both spreads expire worthless.
Max loss: The spread width ($10) minus the total credit ($2.00) = $8.00 per share, or $800 per Iron Condor.
Breakevens:
- Lower Breakeven = 4950 − 2.00 = 4948.00
- Upper Breakeven = 5100 + 2.00 = 5102.00
Range you want: If SPX finishes anywhere between about 4948 and 5102, you keep some or all of the $200 credit. If it finishes between 4950 and 5100, you keep the full $200.
Remember, an Iron Condor is not about predicting direction but about profiting from time decay and controlled volatility.
When to Trade (Iron Condor Volatility Conditions)
Timing is everything. I like to deploy Iron Condors when markets feel calm but option premiums are still high. That usually means:
- The VIX (volatility index) is elevated but starting to cool off.
- SPX or QQQ is range-bound with clear support and resistance.
- Major news or earnings events are behind us.
The goal is simple: sell expensive options and let them decay as the market stays quiet. That’s where the Iron Condor volatility edge comes from. I typically open my Condors 20–45 days before expiration. That gives enough theta (time decay) to work, but not so long that new risks creep in.
Trader’s tip: if volatility is too low when you open the trade, premiums will be tiny and your Iron Condor win rate may drop. You should only enter when there is a mild increase in implied volatility. You have to have some air under your wings, just as you have to wait till you get a good headwind before you can glide off a hill.
• Low or falling volatility (IV dropping helps condors quickly)
• Clear support and resistance zones
• No upcoming major events (CPI, FOMC, earnings)
• Range-bound price action
These conditions improve win rates and help time decay work in your favour.
Adjustments and Management
Even the best setups need attention. When I trade Condors, I don’t “set and forget.” I monitor them like a hawk. Here’s how I handle Iron Condor management:
- Profit Target: Close the trade when you’ve captured 50–70 % of max profit. No need to squeeze the last dollar.
- Adjustment Timing: If the price moves near either short strike, I adjust the other side to collect extra credit or roll out in time.
Iron Condor Adjustment Example
Suppose SPX rallies to 5080 in our earlier example. The bear call side gets threatened. I might close that spread and open a new bear call further up (5200 / 5210). That resets the risk zone and adds fresh premium.
Exit Before Expiration: I rarely let an Iron Condor expire completely. Gamma risk — spikes in price near expiry — can wipe out gains. I prefer closing 1–2 days before expiration.
This active management is why experienced traders like me achieve a higher Iron Condor success rate than those who just sit back. Managing Condors is like flying a plane in cruise mode: you don’t change course every minute, but you definitely keep an eye on the controls.
What is Iron Condor Risk Management?
Effective iron condor risk management is the difference between a steady income strategy and a strategy that blows up after one bad week. After decades of running SPX condors, I’ve found the most reliable risk rules fall into four categories:
1. Size small and stay consistent
Never size an iron condor based on confidence or “how good the setup feels.” Size based on risk.
Most professionals risk 1–3% of account equity per condor, even in calm markets.
2. Take profits early (50–70% credit)
Waiting for the last 10–20% of premium dramatically increases gamma risk.
Closing early locks gains and removes exposure during the most dangerous period.
If SPX pushes into your short call or put, you can:
roll the opposite spread inward to collect credit
roll the threatened side up/down
or close and re-establish further out
The key: do not freeze when one side is under pressure.
4. Avoid high-volatility events
Economic events (FOMC, CPI, NFP) regularly destroy condors. When implied volatility expands sharply, both wings widen and risk jumps.
A disciplined iron condor trader focuses on controlled environments, small consistent wins, and removing emotion from adjustments.
Iron Condor vs Iron Butterfly
New traders often ask me about the difference between an Iron Condor and an Iron Butterfly. They look similar but behave quite differently.
| Feature | Iron Condor | Iron Butterfly |
|---|---|---|
| Structure | Sell out-of-the-money call and put credit spreads | Sell at-the-money straddle with wings for protection |
| Profit Zone | Wider range, smaller premium | Narrower range, larger premium |
| Risk Profile | Lower reward, lower risk | Higher reward, higher risk |
| When to Use | Low to moderate volatility | Very low volatility and strong confidence in the range |
In simple words: a Butterfly is a Condor with tighter wings and sharper reward. If you’re still getting comfortable with range-bound strategies, start with the Condor; it forgives small mistakes.
The Iron Condor strategy offers more room for error and is perfect for building discipline in defined-risk trading. If you’d like to see more on how automation can assist with managing positions like these, visit our Automated Options Trading Guide.
Bullish and Bearish Variations
Here’s something many beginners miss: an Iron Condor doesn’t always have to be neutral. You can actually “tilt” it slightly bullish or bearish depending on your market bias.
Bullish Iron Condor
When I expect prices to drift higher but not skyrocket, I build a Bullish Iron Condor by moving the entire setup slightly below the current price.
- I sell puts closer to the money.
- I sell calls farther away.
This gives me a little bullish cushion and higher credit on the put side. I use this when SPX or QQQ shows higher lows and strong support zones.
Bearish Iron Condor
When the market feels heavy or near resistance, I shift to a Bearish Iron Condor — the mirror image.
- Calls are closer to the money.
- Puts sit farther below.
That positioning favors gentle downside drift. It’s how I trade when I think the rally’s running out of fuel but don’t want to short outright.
In any case, the point remains unchanged: defined risk, consistent theta decay, and calm execution. The Iron Condor strategy doesn’t work on adrenaline but on patience — whether it’s a bullish or a bearish setup.
Strategy Success Rate
Let’s talk about what everyone wants to know — the Iron Condor success rate. I’ve tracked thousands of Condors across indexes over the years. Through disciplined management, the win percentage usually ranges around 75% to 90%. But here’s the catch: your average loss can be bigger than your average win if you don’t control exits.
That’s why I focus on:
- Small, consistent gains — taking profits early.
- Tight risk control — cutting losers fast.
When you follow those habits, the math tilts in your favor. High success rates don’t come from guessing direction; they come from smart Iron Condor management and timing. Remember, it’s a “singles and doubles” strategy, not a home-run swing.
Want to see how we trade SPX Iron Condors automatically each week?
Try our Weekly Premium Service and get real SPX trade signals and adjustments from institutional-grade automation.
Example Trade (SPX / QQQ)
Let’s walk through a real-style SPX Iron Condor example so you can picture the whole process.
Setup:
- Underlying: SPX @ 5050
- Days to Expiration: 3
- Volatility: Moderate (VIX ≈ 15–17)
Bear Call Spread (Upside):
- Sell 1 5100 Call @ 1.60
- Buy 1 5110 Call @ 0.60
Bull Put Spread (Downside):
- Sell 1 4950 Put @ 1.70
- Buy 1 4940 Put @ 0.70
Net Credit: $1.00 + $1.00 = 2.00 ($200)
Payoff Summary:
- Max Profit: $200 if SPX stays between 4950–5100
- Max Loss: $800
- Breakevens: 4945 and 5105
I’d open this about 3 days out and close when 60–70 % of profit is captured. If SPX breaks above 5100, I’d roll the call side higher — a classic Iron Condor adjustment. This trade uses both bull put and bear call logic, the same foundation you read about earlier. That’s why I always tell new traders: learn the spreads first, then combine them into Condors.
Common Mistakes and Risks
Even seasoned traders trip up here. I have observed it more than once, and I’ve committed some of these errors myself early in my career. I’ll spare you some bruises — and maybe some gray hair.
1. Holding Too Long
This is the silent killer of profits. Time decay speeds up beautifully near expiration, but so does gamma risk — the rate of change in delta. If price starts flirting with your short strike in the final days, small moves can blow up into big losses fast.
I’ve learned the hard way: never try to squeeze out the last drop of premium. I usually close 3–5 days before expiry, even if that means leaving a few dollars on the table. You’ll thank yourself later.
2. Ignoring Volatility
Traders often fall in love with low-volatility setups because they “look safe.” But if you sell options when implied volatility is dirt cheap, you’re getting paid too little for the risk you’re taking.
I always check the implied volatility percentile (IV Rank) before entering. Ideally, I want IV to be in the 50–70 % range — that’s where premium is rich enough to justify the trade. When volatility drops after entry, that “vol crush” works in your favor, and you profit faster.
3. Wrong Position Size
This one kills more accounts than bad entries. Many traders think, “It’s range-bound, so let’s double size.” Then one big move hits and months of income vanish overnight.
The Iron Condor is about staying in the game, not swinging for fences. If your Condor goes wrong, you want it to sting — not sink you.
4. No Plan for Adjustment
Adjustments aren’t improvisation; they’re part of the plan. You should know before you enter what you’ll do if the market moves against you.
For example:
- If price nears your short call, consider rolling that side up and out.
- If volatility spikes, reduce exposure or close early.
- If profits hit 50–70 % of max, take them. Don’t wait for “just a little more.”
I even keep an Iron Condor management checklist next to my screen — entry, monitoring, profit target, exit. That piece of paper has saved me from emotional mistakes more than once.
5. Forgetting Commissions and Slippage
Four legs mean four trades going in and four going out. Fees and slippage can quietly eat away at returns. If your broker charges high commissions or has wide bid-ask spreads, those “nickels and dimes” can add up.
Choose platforms that offer tight spreads and fair fees. Good execution is part of your edge.
6. Emotional Overtrading
Here’s an extra one that rarely gets mentioned. Some traders get addicted to collecting premium every week. They sell Condors non-stop, even in wild markets. That’s like flying through a storm with no radar.
Patience pays. I only trade Condors when the market conditions line up: calm volatility, clear range, and clean technicals. If things look uncertain, I sit it out. Sometimes the best trade is no trade.
Trading Condors is comparable to piloting an aircraft. When you fall into turbulence you do not panic and bang your head on the instruments. You have a checklist, you trust your instruments, and you protect your altitude.
And this is the golden rule I tell every new trader: don’t be result-oriented, be process-oriented. Do that consistently and the profits will take care of themselves.
Tools and Platforms
When it comes to trading Iron Condors, having the right cockpit makes all the difference. You can’t fly blind; you need instruments that help you visualize risk, manage trades, and spot volatility shifts before they bite. Over the years, I’ve tested almost every platform out there — and these are the ones I trust most:
1. ThinkorSwim (TD Ameritrade)
If you’re serious about visual learning, this platform is gold. The Analyze tab lets you model trades, view the Iron Condor payoff diagram, and see how profits or losses change with time and volatility.
I often build my SPX setups here before placing them elsewhere. Plus, their simulated trading is great for beginners — you can test strategies without burning real cash.
2. Tastytrade Platform
Built by traders for traders. Tastytrade makes income-based strategies like the Iron Condor simple to execute and manage. The platform shines when it comes to real-time adjustment visualization: you can roll legs, close partial positions, or adjust deltas with just a few clicks.
I especially like how it color-codes profit zones, making trade management visual and intuitive.
3. Interactive Brokers (IBKR)
For advanced users or larger accounts, IBKR is tough to beat. Low commissions, reliable fills, and deep liquidity make it a favorite for those who run multiple Condors at once. It’s not flashy, but it’s efficient — and in trading, efficiency pays.
Their margin analytics also help me calculate how each Iron Condor adjustment affects overall portfolio risk.
4. OptionStrat and OptionsPlay
If you’re more analytical, these are must-haves. They’re perfect for modeling how time decay and volatility affect your Condor over days or weeks. With just a few inputs, you can test different strikes, expirations, and even simulate what happens if volatility spikes.
I use them to refine my SPX Iron Condor examples before taking real trades.
5. CBOE Volatility Index (VIX)
Before entering any Condor, I check the VIX like a pilot checks the weather radar. It tells me whether skies are calm or stormy. A rising VIX means traders expect more turbulence — not the best time to sell premium.
Ideally, I look for Iron Condor volatility between 15–25. That’s where the premiums are juicy, but the risk isn’t sky-high.
6. My Personal Logbook
It might sound old-school, but my best trading tool isn’t fancy software; it’s a spreadsheet. After every trade, I log:
- Entry date and credit received
- Exit date and profit or loss
- Days in trade
- Volatility conditions
- Notes on adjustments
Then I review it monthly. Patterns jump out fast. Maybe I closed too early during calm weeks, or held too long in volatile ones. This is how I made my Iron Condor success rate a success — not by guessing, but by honest data tracking.
Conclusion
It’s understandable why the Iron Condor is one of my favorite strategies. It’s predictable, fixed-risk, and it doesn’t need perfect timing. In the right market — when prices drift inside a range and volatility cools — it can deliver consistent monthly income.
I’ve used Condors for decades on SPX, NDX, and RUT, and the principle never changes: sell time, define risk, and manage smartly.
If you want to see how professionals trade these every week, join our Weekly Premium Iron Condor Service. You’ll get real Iron Condor signals, live trade examples, and the same adjustments I use in my accounts.
FAQs
Should I let my Iron Condor expire?
I rarely do. Time decay may tempt you, but last-minute volatility can destroy gains. I close 3–5 days early to lock profits safely.
Is an Iron Condor bullish or bearish?
By design it’s neutral, but you can adjust strikes to create Bullish Iron Condor or Bearish Iron Condor variations depending on bias.
Does an Iron Condor Count as a 1-Day Trade?
It depends on how long you hold it, not the structure itself.
An iron condor can be a 1-day trade if you open and close it on the same trading day. In that case:
It does count as a day trade
It counts toward PDT rules (Pattern Day Trader) if you are under $25,000
However:
Most traders hold iron condors for several days to several weeks
Short-duration condors (0DTE, 1DTE, 2DTE) are extremely popular, but they are not classified as day trades unless opened and closed on the same day.
When should I avoid trading Condors?
Skip them before major economic reports or Fed decisions — volatility can explode. Wait until the market calms.
How does an iron condor make money?
An iron condor makes money through time decay. When you open the trade, you collect a net credit from selling both a call spread and a put spread.
As each day passes without a large price move, the options you sold lose value. If price stays between the two short strikes through expiration, all four legs expire worthless and you keep the full credit.
What is the iron condor breakeven formula?
An iron condor has two breakeven points. The upper breakeven equals the short call strike plus the net credit received.
The lower breakeven equals the short put strike minus the net credit received. For example, with a short call at 5100, a short put at 4950, and a $2.00 net credit, the breakevens are 5102 and 4948.
How do you pick strikes for an iron condor?
Iron condor strikes are typically selected so that each short strike has a delta of 0.15 to 0.20 — roughly one standard deviation away from the current price.
This gives each side approximately an 80–85% probability of expiring out of the money. Wider strike placement lowers the probability of loss but also reduces the premium collected.
What is a good credit to collect on an iron condor?
A good credit target for an iron condor is roughly 20–33% of the spread width. On a $10-wide SPX condor, that means collecting at least $2.00–$3.00.
Collecting less than 20% of the spread width means the risk-reward is unfavourable — you are risking too much relative to the potential gain.
Is an iron condor good for beginners?
An iron condor is manageable for beginners who understand the basics of credit spreads, but it is not an ideal first options strategy.
The four-leg structure requires understanding of delta, theta, and expiration risk. Beginners are usually better served learning bull put spreads or bear call spreads individually before combining them into a condor.
What is the max loss on an iron condor?
The maximum loss on an iron condor equals the width of one spread minus the total net credit received. On a $10-wide condor opened for a $2.00 credit, the maximum loss is $8.00 per share, or $800 per contract. This loss is only realised if price closes beyond one of the long strikes at expiration.
What is the typical iron condor win rate?
Iron condor win rates of 70–90% are achievable with disciplined strike selection and active management.
However, the average loss on losing trades is typically larger than the average gain — which is why taking profits early at 50–70% of maximum credit is essential. Win rate alone does not determine profitability; risk management does.
Master the Iron Condor: Complete Learning Path